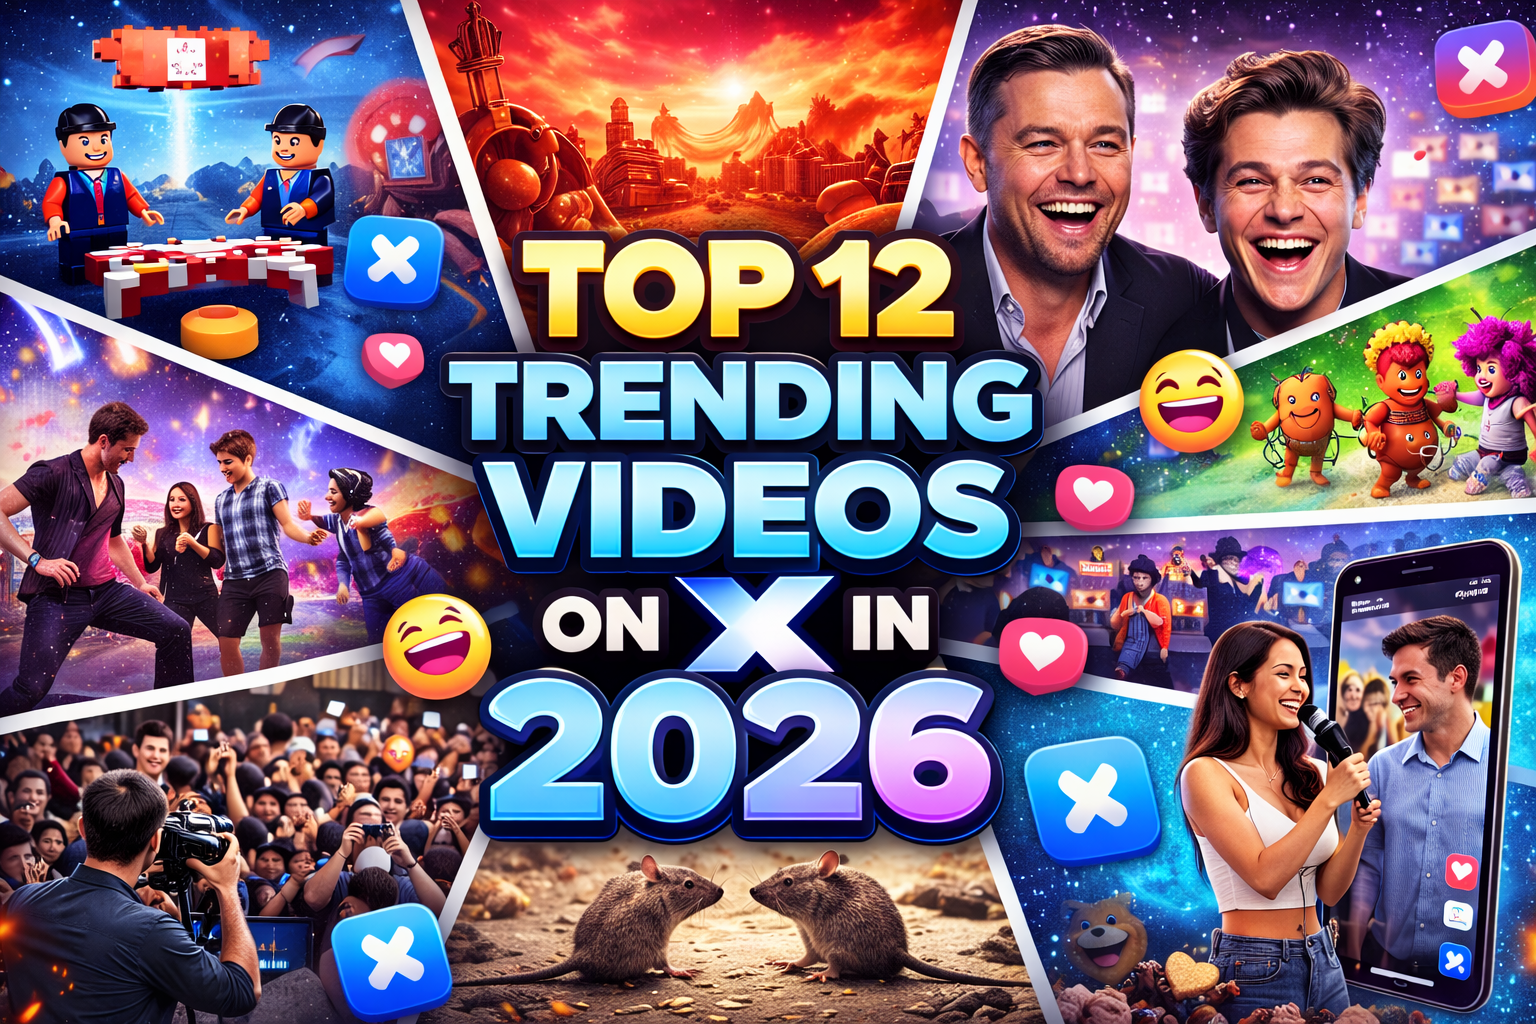
Remedios caseros para hacer crecer las uñas más rápido y fuertes

PUBLICIDADE

Tener uñas largas y fuertes es una meta estética para muchas personas. Sin embargo, factores como la dieta, el estilo de vida, y el cuidado personal pueden influir en la salud de las uñas. Afortunadamente, existen remedios caseros que pueden promover el crecimiento de las uñas de manera efectiva. A continuación, se detallan cinco remedios caseros respaldados por evidencia anecdótica y algunos estudios preliminares.

Remedios caseros para hacer crecer las uñas más rápido y fuertes

Las uñas se rompen, se abren, y pueden incluso volverse tan frágiles que casi resulta imposible mantenerlas largas. Si te ocurre algo de esto, no dudes en probar alguno de los remedios caseros que te proponemos para lucir unas uñas perfectas.

1. Ajo

El ajo es conocido por sus propiedades antimicrobianas y antioxidantes. Contiene selenio, un mineral que es esencial para la salud de las uñas.

Modo de uso

PUBLICIDADE
  • Preparación: Tritura uno o dos dientes de ajo hasta formar una pasta.
  • Aplicación: Aplica la pasta de ajo sobre las uñas y deja actuar durante 10-15 minutos.
  • Lavado: Enjuaga con agua tibia y aplica una crema hidratante.

Por qué funciona

El selenio presente en el ajo ayuda a fortalecer las uñas y promover su crecimiento. Sus propiedades antimicrobianas también ayudan a prevenir infecciones que pueden debilitar las uñas.

2. Aceite de Coco

El aceite de coco es conocido por sus propiedades hidratantes y antimicrobianas. Está compuesto principalmente por ácidos grasos de cadena media, que penetran fácilmente en la piel y las uñas, proporcionando una hidratación profunda.

Modo de uso

PUBLICIDADE
  • Calentamiento: Calienta una pequeña cantidad de aceite de coco hasta que esté ligeramente tibio.
  • Aplicación: Masajea el aceite sobre las uñas y cutículas durante unos 5 minutos.
  • Repetición: Realiza este masaje dos veces al día, preferiblemente una vez por la mañana y otra antes de acostarte.

Por qué funciona

El masaje con aceite de coco mejora la circulación sanguínea alrededor de las uñas, promoviendo un crecimiento más rápido. Además, sus propiedades antimicrobianas ayudan a prevenir infecciones que pueden debilitar las uñas.

3. Jugo de Limón

El limón es rico en vitamina C, un antioxidante que es crucial para la producción de colágeno. El colágeno es una proteína esencial que fortalece las uñas y promueve su crecimiento.

Modo de uso

PUBLICIDADE
  • Preparación: Exprime el jugo de un limón fresco.
  • Aplicación: Sumerge tus uñas en el jugo de limón durante unos 10 minutos.
  • Lavado: Enjuaga con agua tibia y aplica una crema hidratante para evitar la sequedad.

Por qué funciona

La vitamina C presente en el jugo de limón fortalece las uñas y las hace menos propensas a quebrarse. Además, el ácido cítrico puede ayudar a blanquear las uñas y eliminar manchas.

4. Bicarbonato de Sodio

El bicarbonato de sodio es un agente exfoliante natural que puede ayudar a mantener las uñas limpias y libres de infecciones. También ayuda a equilibrar el pH de la piel y las uñas.

Modo de uso

  • Preparación: Mezcla una cucharada de bicarbonato de sodio con un poco de agua para formar una pasta.
  • Aplicación: Frota suavemente la pasta sobre las uñas y cutículas durante 5 minutos.
  • Lavado: Enjuaga con agua tibia y aplica una crema hidratante.

Por qué funciona

El bicarbonato de sodio exfolia suavemente las uñas, eliminando células muertas y promoviendo un crecimiento más saludable. Su capacidad para equilibrar el pH ayuda a prevenir infecciones fúngicas.

5. Vinagre de manzana

Es un producto con propiedades antifúngicas y antimicrobianas, ideal para el tratamiento de infecciones provocadas por hongos.

Modo de uso

  • En un recipiente, mezcla 200 ml de agua y 100 ml de vinagre.
  • Introduce las uñas en la mezcla durante unos 10 o 15 minutos.
  • Repetir el tratamiento dos veces a la semana.

Consejos sobre cómo hacer crecer tus uñas

Aquí tienes algunos consejos rápidos y prácticos para ayudarte a hacer crecer tus uñas más rápido y fuertes:

  • Mantén las uñas hidratadas: Aplica regularmente aceites o cremas hidratantes en tus uñas y cutículas. El aceite de coco y el aceite de oliva son excelentes opciones.
  • Usa un endurecedor de uñas: Los fortalecedores de uñas pueden ayudar a prevenir que se quiebren y se partan, permitiendo que crezcan más largas.
  • Lleva una dieta equilibrada: Incluye en tu dieta alimentos ricos en biotina, vitamina E y proteínas, como huevos, nueces, pescado y vegetales verdes.
  • Evita el uso excesivo de esmaltes: Deja que tus uñas respiren de vez en cuando. Evita usar esmalte de uñas constantemente y dale a tus uñas un descanso entre manicuras.
  • No muerdas tus uñas: Evita morderte las uñas o usar tus uñas como herramientas. Esto puede causar daños y retardar el crecimiento.
  • Lima tus uñas correctamente: Lima tus uñas en una sola dirección en lugar de hacer un movimiento de ida y vuelta, ya que esto puede debilitar tus uñas.
  • Mantén tus cutículas cuidadas: No cortes tus cutículas; en su lugar, empújalas suavemente hacia atrás después de una ducha o baño, cuando están más blandas.
  • Evita la exposición prolongada al agua: Mantén tus uñas secas tanto como sea posible, ya que la exposición prolongada al agua puede debilitarlas.
  • Toma suplementos si es necesario: Si tienes deficiencias nutricionales, considera tomar suplementos de biotina o colágeno, pero consulta a un médico antes de hacerlo.

Estos consejos pueden ayudarte a mantener tus uñas en buen estado y promover un crecimiento más rápido y saludable.

PUBLICIDADE

Cómo Tejer Alfombras a Crochet para Principiantes: Una Guía Detallada

PUBLICIDADE

Tejer alfombras a crochet es una actividad gratificante que combina creatividad y funcionalidad. Para los principiantes, puede parecer un desafío, pero con paciencia y práctica, pronto podrás crear alfombras hermosas y únicas para tu hogar.

Cómo tejer alfombras a crochet para principiantes

En este artículo, te guiaré a través de los pasos básicos y te proporcionaré consejos útiles para empezar.

Materiales Necesarios

Antes de comenzar, asegúrate de tener los siguientes materiales:

  • Hilo o Tira de Tela: Puedes usar hilo de algodón grueso o tiras de tela cortadas (trapillo), idealmente en colores y texturas que te gusten.
  • Aguja de Crochet: El tamaño recomendado dependerá del grosor del hilo o trapillo que elijas.
  • Tijeras: Para cortar el hilo o las tiras de tela según sea necesario.
  • Base Antideslizante (opcional): Para asegurar la alfombra al piso una vez terminada.

Paso 1: Elegir el Patrón y Diseño

Antes de comenzar a tejer, decide qué tipo de patrón o diseño deseas crear. Para principiantes, es recomendable empezar con patrones simples como rayas o formas geométricas básicas. Puedes encontrar patrones gratuitos en línea o crear el tuyo propio.

PUBLICIDADE

Paso 2: Montaje Inicial

  • Nudo Corredizo: Comienza con un nudo corredizo en el gancho de crochet.
  • Cadena de Base: Realiza una cadena de base con la cantidad de puntos que necesites según el tamaño y forma de la alfombra que deseas hacer. Esta cadena servirá como la base de tu proyecto.

Paso 3: Tejido de la Alfombra

  • Puntos Básicos: Los puntos más comunes para tejer una alfombra son el punto bajo y el punto alto. Aprende cómo hacer estos puntos básicos si aún no estás familiarizado con ellos.
  • Tejido en Filas: Trabaja en filas para construir la longitud deseada de la alfombra. Alterna los colores o materiales según tu diseño.
  • Incrementos y Disminuciones: A medida que ganas experiencia, puedes experimentar con incrementos y disminuciones para crear formas más complejas o ajustar el tamaño de tu alfombra.

Paso 4: Acabado y Remates

  • Remate Final: Al finalizar la última fila, corta el hilo dejando un extremo suficientemente largo para rematar.
  • Acabados: Asegura los extremos sueltos con una aguja de tapestry o crochet, y considera agregar una base antideslizante si es necesario para evitar que la alfombra se mueva sobre el piso.

Consejos Útiles para Principiantes

Tejer alfombras a crochet puede parecer desafiante al principio, pero con estos consejos prácticos, podrás avanzar con confianza y disfrutar del proceso creativo:

  1. Practica la Tensión: Mantén una tensión uniforme en el hilo para evitar que la alfombra quede demasiado apretada o floja.
  2. Selecciona el Hilo Correcto: Elige un hilo o trapillo que sea fácil de manejar y adecuado para tu nivel de habilidad.
  3. Persistencia y Paciencia: No te desanimes si al principio encuentras difícil mantener el ritmo. Con la práctica, mejorarás notablemente.

Experimenta con diferentes colores y texturas para crear alfombras únicas que complementen tu decoración interior. A medida que adquieras más habilidades, podrás explorar técnicas más avanzadas y diseños más intrincados.

Modelos de alfombras tejidas a crochet

Tejer alfombras a crochet ofrece una amplia variedad de modelos y diseños que pueden adaptarse a diferentes estilos y preferencias. Aquí te presento algunos modelos populares de alfombras tejidas a crochet que podrían inspirarte:

1. Alfombra Redonda de Ganchillo

Descripción: Las alfombras redondas son muy populares por su diseño estético y su versatilidad. Puedes utilizar diferentes colores para crear patrones geométricos o simplemente optar por un diseño monocromático.

PUBLICIDADE

Estilo: Ideal para espacios pequeños como dormitorios, áreas de lectura o bajo mesas auxiliares.

2. Alfombra Rectangular con Diseños Geométricos

Descripción: Esta alfombra utiliza técnicas de cambio de color para crear patrones geométricos como rayas, cuadros o triángulos. Puedes jugar con la combinación de colores para lograr efectos visuales interesantes.

Estilo: Perfecta para salas de estar o comedores, donde puedes coordinar los colores con la decoración existente.

3. Alfombra Ovalada de Crochet

Descripción: Similar a la alfombra redonda pero con una forma ovalada, esta opción puede ser más adecuada para pasillos o espacios largos y estrechos.

PUBLICIDADE

Estilo: Funciona bien en áreas de tránsito donde se desea una alfombra que no sea completamente circular.

4. Alfombra Cuadrada con Textura

Descripción: Las alfombras cuadradas tejidas a crochet pueden incluir texturas como trenzas o relieves que agregan interés visual y táctil.

Estilo: Perfecta para zonas donde se desee una superficie con mayor densidad y resistencia, como entradas o áreas de alto tráfico.

5. Alfombra en Forma de Flor o Motivo Decorativo

Descripción: Estas alfombras utilizan formas florales u otros motivos decorativos como el sol, estrellas, o incluso animales, creando piezas únicas y personalizadas.

Estilo: Ideal para habitaciones infantiles o espacios donde se quiera añadir un toque lúdico y alegre.

Con estos modelos y consejos, podrás empezar a tejer tus propias alfombras a crochet y embellecer tu hogar con piezas únicas y hechas a mano. ¡Disfruta del proceso creativo y deja volar tu imaginación!

Conclusión

Tejer alfombras a crochet es una manera maravillosa de agregar un toque personalizado a tu hogar mientras desarrollas nuevas habilidades creativas. Con esta guía y un poco de práctica, estarás en camino de crear hermosas alfombras que no solo decorarán tu espacio, sino que también te llenarán de satisfacción por haberlas hecho tú mismo. ¡Disfruta del proceso y deja volar tu creatividad!

PUBLICIDADE

20 Crochet Bikini Patterns You’ll Love Making

PUBLICIDADE

Are you looking for an easy-to-make crochet top, bikini top or bralette? If so, you’ll love this roundup of patterns! Since there is a good deal of crochet bikini or bralette top patterns on the Internet, the chances are you’ll be able to find a bikini pattern that fits your style and your body type.

Since there are so many, I’ve made it easier for you to find the best crochet bikini top for you! You’ll find crochet bikinis in a range of crochet patterns in all sizes for every skill level, from beginner to expert.

So if you are just learning how to crochet a bikini top or are an experienced crocheter, I’m hoping there is a pattern for you below to make. Enjoy!

Crochet Bikini Patterns

Since there are quite a few free crochet patterns as well as paid to choose from below, you will be sure to find the perfect crocheted bikini top for you!

PUBLICIDADE

Keep on reading to learn about the supplies you’ll want to have on hand before starting one of these top patterns. Enjoy!

Supplies For Crochet Bikini Patterns

Here is what you will need to crochet a bikini:

  • Crochet Hooks: Use a crochet hook size to match your yarn. Common hook sizes for crochet bikinis are 3.5 mm (E/4), 4 mm (G/6), or 4.5 mm (7). If you require a tighter stitch, you may size down from that recommended on the yarn label.
  • Yarn: The yarn you choose should be washable and dry quickly. See below for more suggestions.
  • Scissors: A pair of sharp, small scissors for trimming ends.
  • Stitch Markers: Many bikini patterns are worked in the round, and these help keep track.
  • Tape Measure: A flexible tape measure will help you take your body measurements for accurate sizing.
  • Tapestry Needle: This is needed for weaving in ends.

What Is The Best Yarn To Crochet Bikinis?

When crocheting a bikini, choose a yarn that is suitable for getting wet. The best type of yarn for crochet bikinis is cotton yarn or a cotton blend with a small percentage of elastane. It needs to be soft, light, and dry quickly.

Here are a few things to consider when crocheting a bikini top or bottom:

PUBLICIDADE
  • Yarn Fiber: Choose yarns that can get wet without shrinking. Cotton, bamboo, and polyester blends are good options. Choose a yarn that is soft and not scratchy on the body. Avoid yarn fibers such as wool which will shrink and be fluffy and scratchy.
  • Durability: Your bikini yarn should be able to handle getting wet regularly and not stretch when wet.
  • Stretch: The addition of some Spandex or Lycra to your yarn will mean it stretches and has good recovery, so your bikini stays in shape.
  • Colorfast: Your yarn should be colorfast when wet. It is usually best to choose lighter colors.

The easiest way to determine most of these factors is to check the care label of the yarn to see if it can be washed.

The yarn you choose will depend on the look you want for the bikini and your skill level. Thicker yarns will be easier for beginners.

Best Crochet Bikini Patterns

1. The Basic Stitch Bikini

Diving right in with this glamorous bikini set, which is ideal for wearing in the tropics. Made in some fiery-toned yarn and worn in an exotic location, this bikini set would be a stunner. It would look great on any body type, and you will find lots of questions directed your way to enquire where you purchased this from.

PUBLICIDADE

2. Brallete & Lace Bikini Pattern

The white bralette brings a sense of feminity to your ensemble, while the delicate lace adds a touch of romance. The intricate lacework creates a captivating pattern, enhancing the overall beauty of the bikini and creating a stunning visual impact.

3. Summer Vibes Bikini Pattern

This versatile creation is not only perfect for the beach but also an excellent choice for upcoming music festivals during the summer season. Its trendy design adds a touch of elegance to any outfit, allowing you to embrace your inner fashionista while enjoying the warm weather and vibrant atmosphere.

4. Colorful Bikini Top Crochet Pattern

Elevate your beach style with a crocheted bikini top featuring a mesmerizing multi-colored pattern and charming ties. This exquisite creation is a testament to the artistry of crochet, combining vibrant hues and intricate stitches to deliver a unique and eye-catching design.

5. Crochet Bikini Set Pattern

The Micro Bikini Crochet is a captivating swimwear style that embraces small crochet stitches, resulting in a daring and alluring swimsuit. The designer has created this pattern using basic stitches and she shows you how to draft a pattern to fit you.

6. Bathing Suit Crochet Pattern

Get ready to make a stylish statement with the Crochet Festival Bikini in an elegant off-white color adorned with an intricate pattern. This stunning creation is designed to capture the essence of bohemian beauty and elevate your festival wardrobe to new heights.

7. Crochet Brallete Bikini

I am excited to introduce you to the Sahara Crochet Bikini Bralette/Top—a creation that not only exudes style but also promises unrivaled comfort. Treat yourself to the beauty and comfort of the Crochet Bikini Bralette, a creation that combines the art of crochet with the desire for ultimate comfort.

8. Festival Crochet Bikini Patterns

Summer evokes a myriad of delightful images: bikinis that showcase sun-kissed skin, the allure of wide-brimmed hats and sunglasses, and the refreshing indulgence of cold drinks. This bikini crochet pattern will fit in with the beach or festival circuit.

9. Wrap Bikini Crochet Patterns

Embrace the must-have essential that every girl needs – the reversible wrap bikini top. This versatile piece is designed to bring endless joy and style to your beach wardrobe. Pair it effortlessly with a flowing bohemian-style skirt for a carefree and boho-inspired look, or layer it with a crisp white blouse for a chic ensemble.

10. Crochet Swimwear Pattern

Embrace the bohemian spirit and pair this crochet festival bikini with your favorite denim shorts, flowy skirts, or vibrant kimono for a truly enchanting look. Add some accessories, such as feather earrings, beaded bracelets, or a flower crown, to complete your festival-inspired ensemble.

11. Basic Crochet Bikini

Hit the beach with some stunning crochet! This crochet bikini pattern is bound to get attention and bag lots of compliments. This pattern comes in three different sizes, and the basic design features a halter top paired with a classic cut bottom. This timeless pattern will keep you returning for it every beach season.

PUBLICIDADE

How to Clean a Couch the Right Way

PUBLICIDADE

Whether you’re a true ‘couch potato’ or not, most people still spend a lot of time sitting on their couch, so dirt, crumbs, and stains are bound to accumulate over time. Since a couch takes center stage in the living room, it’s important to know how to keep it clean. From minimizing the impact of accidental spills to freeing your couch from everyday debris, our cleaning pros have the answers that will teach you how to clean a couch effectively!

How to Clean the Sofa

Couch cleaning strategies vary, but generally speaking, you’ll want to wipe the sofa down using the appropriate couch upholstery cleaner. Focus on scrubbing the stained areas, then allow the area to dry before you assess your success at removing the stain.

How to clean a couch successfully often comes down to using the right cleaning solution on your particular couch fabric. Here are some things to consider when cleaning each type of fabric.

How to Clean a Cloth Couch

Learning about cleaning furniture fabric takes a little practice and patience. What works best for one fabric couch may not work well for another. So, use these tips the next time your cloth sofa requires a thorough cleaning, but be sure to adjust your technique based on the color and specific type of fabric.

PUBLICIDADE
  • Brush the couch. Use a clean white towel or stiff brush to loosen anything that has dried onto the couch.
  • Apply baking soda. Sprinkle baking soda on the entire couch. Leave it for 20 minutes to an hour. Then vacuum the baking soda up with a brush attachment.
  • Make a DIY couch cleaner. While the baking soda sets in, you can concoct a simple cleaner to remove any remaining stains. Combine 1 tsp dishwashing liquid, 1 tbsp -white vinegar, and 1 cup warm water in a spray bottle. Next, add 1 tsp of baking soda and put the top on the spray bottle. It’s best to create this solution over a sink to avoid a mess. (Baking soda and vinegar create a lot of bubbles when combined!)
  • Wipe down the couch. Spray a clean white cloth with the cleaning solution and use it to gently dab and rub any stains on the fabric. Alternatively, wipe down the entire sofa with the solution for a good cleaning.
  • Let the fabric dry. Leave the couch to dry for a few hours. Do not sit on the couch or place anything on it during this time.

How to Clean a Microfiber Couch

When it comes to DIY couch cleaning, rubbing alcohol can be a real lifesaver—especially when dealing with microfiber sofas. As previously mentioned, be sure to check that tag and test the solution on a small area before using it to clean the entire couch. The cleaning code “S” (for “solvent”) means rubbing alcohol is a great option.

  • Scrub with rubbing alcohol. Working section by section, spray an area with rubbing alcohol and then scrub with a white or light-colored sponge (so no color transfers from the sponge to the couch while you scrub). You should see the stains lift onto the sponge as you go.
  • Brush in circles. The couch should dry quickly because alcohol evaporates rapidly. Once it’s dry, use a dry scrub brush to fluff the fabric. It’s best to brush using a circular motion.
  • Repeat the process with distilled water. If there are any water stains on the couch (and both water and solvent cleaning are acceptable), follow the same cleaning process mentioned, but replace the alcohol with distilled water.

How to Clean a Suede Couch

If you’ve ever wondered how to clean a suede couch, we have some tips that can help restore its original luster. Suede is a popular choice for sofas because it looks good and feels very comfortable. Unfortunately, suede material also has a reputation for being difficult to maintain. Therefore, a little extra care is required for cleaning furniture fabric on your suede couch. Here are our tips for cleaning a suede couch:

  • Refresh your suede couch with a damp cloth. Avoid getting the suede too wet. Squeeze as much water out of a washcloth as possible before applying it to the couch. The damp cloth will remove surface dirt and debris without damaging the suede material.
  • Find a product designed specifically to clean suede. As we have recommended several times before, always test any new cleaning product in a small, less-visible area of the couch before using it all over. Dab a little area of the couch with the solution and wait about 20 minutes to see how it reacts with the material. If you can’t find special suede cleaners, try a little distilled white vinegar.
  • A rubber eraser can be used to gently wipe away stubborn stains. This is especially helpful for ink and crayon stains that have become embedded in the suede over time.
  • For wet stains, blot up as much of the moisture as you can. Apply a suede-friendly stain treatment, and let it sit for a few minutes. Rinse the couch with a clean, damp washcloth. Dry the area with a hair dryer.

How to Clean a Velvet Couch

If you’re curious about how to clean a couch made of velvet, patience is key. Velvet has a well-earned reputation for being high-maintenance. While velvet sofas don’t require any special equipment or supplies to clean, they do require close attention and care. Velvet should be vacuumed weekly to keep it in the best condition possible. If your velvet couch requires a deeper clean, follow these steps:

  • Clean stains with paper towels first. Sop up as much moisture as possible. If the stain is solid, use a butter knife to lift as much of it off the material as possible. Then mix a few drops of dishwasher detergent with some warm water and gently blot the stain; never rub it.
  • To address creases and wrinkles in the fabric, try using a steam cleaner (one used for clothes). Start on the lowest temperature setting, and slowly work your way up to remove wrinkles.
  • Once the couch is dry, use a soft, dry brush to keep it looking brand new.

How to Clean Couch Cushions

How to clean couch cushions successfully depends on the material they are made of. Therefore, you’ll need to choose a cleaning method that works well on the cushion material you have. Removable cushions are a little easier to clean since you can toss them right in the washing machine, provided they are washable. If not, here are a few best practices to keep in mind when cleaning any kind of couch cushion:

PUBLICIDADE
  • If you have pets, try using a pair of rubber gloves to start your cleaning efforts. Rubbing your gloved hands over pet fur is a quick and easy way to remove the hair from your cushions.
  • Next, vacuum the entire couch, paying attention to the little nooks and crannies where crumbs and other things are prone to fall.
  • Use a solvent-based cleaner that’s recommended for the fabric you have. Don’t forget to run a spot test on a small area before using the cleaner all over your cushions.
  • If you can’t find a recommended cleaner, try mixing a small amount of mild dish detergent with warm water. Add a little to an upholstery brush, and gently scrub any stains. If this method is effective, apply it to the rest of your cushions.

Cleaning couch cushions that can be removed is one thing; cleaning couch cushions that cannot be removed is a little more challenging. So it’s time to bring the heat in the form of steam! Applying steam to specific areas of your cushions is a great way to remove those stubborn stains. Since most clothing steamers are portable, you can get into even those hardest-to-reach spaces.

PUBLICIDADE

Como Levantar Párpados Caídos Sin Cirugía

PUBLICIDADE

¿Buscas mejorar la apariencia de tus párpados caídos, pero no sabes cómo? En este artículo te invitamos a descubrir trucos naturales que te asegurarán la mejora paulatina de tus párpados caídos sin cirugía y sin maquillaje. Si bien la cirugía es una opción para tratar este problema, existen varios remedios naturales que pueden ayudar a levantar los párpados caídos. Aquí presentamos cinco remedios naturales que puedes probar en casa.

1. Ejercicios Faciales

Los ejercicios faciales son una forma efectiva de fortalecer los músculos alrededor de los ojos, lo que puede ayudar a reducir la apariencia de los párpados caídos. Uno de los ejercicios más simples es el levantamiento de cejas:

  1. Coloca los dedos índice justo debajo de las cejas.
  2. Levanta las cejas mientras aplicas una ligera resistencia con los dedos.
  3. Mantén esta posición durante 10 segundos.
  4. Repite este ejercicio 10 veces.

Este ejercicio ayuda a fortalecer los músculos del área ocular, mejorando la firmeza de la piel y reduciendo la caída de los párpados con el tiempo.

2. Pepino

El pepino es conocido por sus propiedades refrescantes y astringentes, que pueden ayudar a tonificar la piel alrededor de los ojos y reducir la hinchazón.

PUBLICIDADE
  1. Corta dos rodajas de pepino fresco.
  2. Refrigera las rodajas durante 10 minutos.
  3. Coloca las rodajas de pepino sobre los párpados cerrados y deja actuar durante 15 minutos.

El uso regular de pepino puede ayudar a mantener la piel hidratada y firme, lo que puede contribuir a levantar los párpados caídos.

3. Clara de Huevo

La clara de huevo es otro remedio popular para tensar la piel floja. Sus propiedades astringentes naturales pueden ayudar a reafirmar la piel de los párpados.

  1. Separa la clara del huevo y bátela ligeramente.
  2. Usando un hisopo de algodón, aplica la clara de huevo sobre los párpados limpios y secos.
  3. Deja que se seque completamente durante 10-15 minutos.
  4. Enjuaga con agua fría.

Este tratamiento temporal puede dar la apariencia de párpados más firmes, aunque los efectos no son permanentes.

4. Bolsas de Té Verde

El té verde contiene antioxidantes y compuestos antiinflamatorios que pueden ayudar a mejorar la elasticidad de la piel y reducir la inflamación.

PUBLICIDADE
  1. Hierve dos bolsas de té verde en agua durante unos minutos.
  2. Saca las bolsas y deja que se enfríen en el refrigerador.
  3. Coloca las bolsas frías sobre los ojos cerrados durante 15 minutos.

Este tratamiento no solo ayuda a reducir la hinchazón, sino que también puede tonificar la piel, haciendo que los párpados se vean más levantados.

5. Masaje con Aceite de Coco

El aceite de coco es rico en antioxidantes y ácidos grasos que nutren la piel y pueden mejorar su elasticidad.

  1. Toma una pequeña cantidad de aceite de coco virgen extra.
  2. Aplica el aceite en los párpados con un suave movimiento de masaje circular.
  3. Masajea durante unos minutos antes de dormir y deja el aceite durante la noche.

El uso regular de aceite de coco puede ayudar a mejorar la firmeza de la piel y reducir la caída de los párpados con el tiempo.

¿Cómo evitar la caída de los párpados?

Además de estos remedios naturales, hay otros hábitos saludables que pueden ayudar a mantener la piel alrededor de los ojos firme y joven:

PUBLICIDADE
  • Duerme lo suficiente: La falta de sueño puede contribuir a la hinchazón y la flacidez de la piel.
  • Hidrata tu piel: Usa una crema hidratante adecuada para mantener la piel nutrida.
  • Protección solar: Usa protector solar para proteger la piel delicada alrededor de los ojos de los daños causados por el sol.
  • Alimentación saludable: Una dieta rica en antioxidantes y vitaminas puede mejorar la salud de la piel.

Estos remedios naturales, combinados con buenos hábitos de cuidado de la piel, pueden ayudarte a levantar los párpados caídos de manera efectiva y sin necesidad de recurrir a tratamientos invasivos. Si los párpados caídos son severos o afectan tu visión, es importante consultar a un médico para una evaluación adecuada y opciones de tratamiento.

PUBLICIDADE

Say Goodbye to Toenail Fungus

PUBLICIDADE

Nail fungus, also known as onychomycosis, is a common condition that affects millions of people worldwide. It occurs when fungi infect one or more of your nails, leading to discoloration, thickening, and crumbling of the nail edges.

While medical treatments are available, many people prefer to try home remedies to combat this persistent issue. This article explores effective home treatments for nail fungus, offering natural and accessible solutions for healthier nails.

Home treatments for nail fungus

It is often stubborn and challenging to treat, but various home remedies can help eliminate the fungus and restore healthy nails. Here are effective treatments to say goodbye to toenail fungus.

PUBLICIDADE

1. Baking soda

Add baking soda to a foot soak to try to heal the affected toenail. You can also make a paste of baking soda with a minimal amount of water and apply it directly to the foot. Allow the paste to sit on the affected area for 10 to 20 minutes, then rinse with warm water and dry the foot thoroughly.

Baking soda can also be sprinkled in shoes like foot powder. Sprinkle on some baking soda, then shake the shoes gently to distribute the powder. Let the shoes sit for at least 24 hours, then shake out any remaining baking soda.

You can also sprinkle baking soda onto the foot. Once applied to a dry foot, put on clean socks. Sodium bicarbonate, the active ingredient in baking soda, can wick away moisture while healing properties work to reduce toenail fungus.

2. Vicks VapoRub

One of the more popular over-the-counter remedies for treating toenail fungus is using Vicks VapoRub. Mentholated topical ointments contain the natural ingredients menthol, oil of eucalyptus, and camphor. Use Vicks alone or in conjunction with other treatments and medications. Clean feet and apply a small amount of Vicks VapoRub daily.

PUBLICIDADE

3. Listerine

Soaking an infected nail in the OTC product Listerine can also help reduce or kill toenail fungus, due to its antifungal and antimicrobial activity. Commonly used as a mouthwash, Listerine applied to the affected toe or toenail for 20 minutes twice a day can effectively reduce signs of onychomycosis. Alternatively, you can make a foot bath with Listerine, using equal parts warm water and Listerine and adding one cup of Epsom salts.

4. Athlete’s foot medication

Athlete’s foot sprays, powders, and creams help stop fungal growth before it develops on the toenail or surrounding flesh. Brand-name products that you can purchase without a prescription include Tinactin (tolnaftate), Micatin (miconazole), Lamisil (terbinafine), and Lotrimin AF (clotrimazole).

5. Coconut Oil

Coconut oil is known for its antimicrobial and antifungal properties, making it a beneficial remedy for nail fungus. It contains medium-chain fatty acids that can penetrate the fungal cell membranes. The fatty acids in coconut oil, particularly lauric acid, help dissolve the cell walls of fungi, leading to their destruction.

Application:

PUBLICIDADE
  • Clean and dry the affected area.
  • Apply a small amount of coconut oil to the infected nail and surrounding skin.
  • Massage gently until the oil is absorbed.
  • Repeat this process two to three times daily.

Ensure to use virgin coconut oil for the best results. There are generally no side effects, but always perform a patch test if you have sensitive

6. Hydrogen peroxide

Hydrogen peroxide can kill the fungus that grows on toenails. You can use hydrogen peroxide for toenail fungus by wiping it on your infected toes or toenails with a clean cloth or cotton swab. A hydrogen peroxide foot soak can also be used. Mix 1/8 cup of hydrogen peroxide (or several capfuls) to four cups of cool water and soak feet for 10 to 20 minutes. Rinse feet with warm water and pat dry.

7. Black tea

Soaking feet in plain tea can also be beneficial in treating toenail or foot fungus. Black tea contains tannic acid that dries out the feet, kills bacteria, and helps to close the foot’s pores to reduce sweating. Boil two quarts of water then add five to six tea bags. Allow the solution to cool and soak feet for 30 minutes. Use this foot soak daily if desired.

8. Soaking feet in vinegar

Another home remedy to treat toenail fungus includes the use of apple cider vinegar foot soak. Vinegar is an antifungal ingredient that can be mixed with water to create a foot soak. Its acetic acid component helps to whiten discolored toenails and stop the spread of the infection to other toes. Try one part vinegar to two parts warm water and soak feet for 20 minutes daily. If the smell is too overwhelming, a few drops of essential oils can be added to make the experience more pleasant. White vinegar can be used as an alternative as both are equally effective.

9. Garlic

Garlic is a potent antimicrobial plant. For topical treatment, chop cloves of garlic and leave them on the affected nails for 30 minutes daily for a week. Use raw garlic sparingly, as it can result in a chemical burn.

Ask a pharmacist about herbal supplements that contain garlic. These supplements can be taken orally to not only treat skin infections but also can help high blood pressure, heart disease, certain cancers, and lower the risk of tick bites. Garlic supplements should not be taken by people with stomach ulcers, digestion problems, or bleeding disorders. It might also make birth control pills less effective. Talk to a healthcare professional before taking oral garlic supplements.

Conclusion

Nail fungus can be a stubborn and persistent problem, but various home treatments offer effective solutions to combat this condition. While these remedies are generally safe and natural, it is important to monitor your skin’s response and consult a healthcare professional if the infection persists or worsens. Combining these treatments with good hygiene practices can help restore your nails to their healthy, fungus-free state.

PUBLICIDADE

Quick Loans Online

PUBLICIDADE

Quick loans, also known as payday loans or cash advances, are short-term, high-interest loans designed to provide immediate financial relief for borrowers facing urgent expenses. These loans are popular due to their accessibility and speed, often disbursed within a day.

However, the ease of access comes with significant financial risks, including high-interest rates and short repayment periods, which can lead to a cycle of debt. This article delves into the intricacies of quick loans, exploring their benefits, risks, and the regulations surrounding them.

Benefits of Quick Loans

Speed and Convenience: Quick loans are designed to provide immediate financial assistance. The application process is fast, with minimal documentation required, and funds are typically available within 24 hours.

PUBLICIDADE

Accessibility: These loans are accessible to a broad range of borrowers, including those with poor credit histories. Lenders often do not require a credit check, making it easier for individuals with low credit scores to obtain funds.

Flexibility: Quick loans can be used for various purposes, including medical emergencies, car repairs, or unexpected bills. This flexibility allows borrowers to address urgent financial needs without restrictions.

Simple Application Process: The application process is user-friendly and can often be completed online. Borrowers only need to provide basic information such as identification, proof of income, and bank account details.

Risks and Drawbacks of Quick Loans

High-Interest Rates: One of the most significant drawbacks of quick loans is their exorbitant interest rates. Annual Percentage Rates (APRs) can exceed 400%, leading to high repayment amounts that can be challenging for borrowers to manage.

PUBLICIDADE

Short Repayment Terms: Quick loans typically have short repayment periods, often due on the borrower’s next payday. This can create financial strain, especially if the borrower is already facing economic difficulties.

Cycle of Debt: Due to the high costs and short repayment terms, many borrowers find themselves unable to repay the loan on time. This can lead to a cycle of debt, where borrowers take out new loans to cover the old ones, accumulating more fees and interest over time.

Lack of Regulation: While some jurisdictions have implemented regulations to protect consumers from predatory lending practices, many areas still lack adequate oversight. This can lead to abusive practices and exploitation of vulnerable borrowers.

Banks That Offer Quick Loans: A Detailed Overview

Quick loans, often known for their speedy approval and disbursement process, are not only provided by payday lenders and online platforms but also by several reputable banks.

PUBLICIDADE

While traditional banks are generally associated with more stringent lending criteria and longer approval times, many have adapted to offer quicker loan options to meet the urgent financial needs of their customers. This article explores various banks that provide quick loans, detailing their offerings, application processes, and what borrowers can expect.

1. Wells Fargo

Product: Personal Loans

Overview: Wells Fargo offers personal loans with a quick application process and fast funding, often within one to two business days. The loans are available in amounts ranging from $3,000 to $100,000.

Application Process: Applicants can apply online, over the phone, or in person. Basic information such as identification, proof of income, and employment details are required.

Interest Rates and Terms: The interest rates vary based on the borrower’s credit profile but typically range from 5.74% to 19.99%. Repayment terms range from 12 to 84 months.

2. Citibank

Product: Personal Loans

Overview: Citibank offers personal loans that can be funded as quickly as the same day of approval. Loan amounts range from $2,000 to $30,000, providing flexibility for various financial needs.

Application Process: The application can be completed online or in a branch. Required documentation includes personal identification, proof of income, and other financial details.

Interest Rates and Terms: Interest rates range from 7.99% to 23.99%, with loan terms from 12 to 60 months, depending on the borrower’s creditworthiness.

3. U.S. Bank

Product: Simple Loan

Overview: U.S. Bank’s Simple Loan is specifically designed for quick, small loans. Customers can borrow between $100 and $1,000, with funds typically available on the same day.

Application Process: Existing U.S. Bank customers can apply online or through the mobile app. The application requires minimal documentation, primarily proof of identity and account history.

Interest Rates and Terms: The fee structure is straightforward, with a $12 fee for every $100 borrowed. The repayment term is three months, with monthly payments automatically deducted from the borrower’s U.S. Bank account.

4. PNC Bank

Product: Personal Loans

Overview: PNC Bank offers personal loans with quick approval and funding, often within one to two business days. Loan amounts range from $1,000 to $35,000.

Application Process: Applications can be completed online, over the phone, or in person. Necessary documents include identification, proof of income, and employment verification.

Interest Rates and Terms: Interest rates range from 5.99% to 24.74%, with loan terms from 12 to 60 months, based on the borrower’s credit profile.

5. TD Bank

Product: Express Loan

Overview: TD Bank’s Express Loan is designed for quick access to funds, offering loan amounts from $2,000 to $25,000. The application process is quick, and funds are typically available within two days.

Application Process: Borrowers can apply online, in a branch, or over the phone. Required documentation includes personal identification and proof of income.

Interest Rates and Terms: Interest rates range from 6.99% to 18.99%, with repayment terms from 12 to 60 months.

6. Chase Bank

Product: Chase Quick Loans (My Chase Loan)

Overview: Chase Bank offers My Chase Loan, a quick loan option available to eligible Chase credit card holders. Loan amounts depend on the available credit line, and funds are disbursed quickly.

Application Process: The process is simple and can be completed online through the Chase mobile app. No additional documentation is required beyond the credit card account.

Interest Rates and Terms: Interest rates are typically lower than credit card rates and are fixed. Repayment terms vary based on the amount borrowed and the borrower’s credit profile.

7. Bank of America

Product: Balance Assist

Overview: Bank of America’s Balance Assist is designed for small, quick loans ranging from $100 to $500. The funds are generally available on the same day.

Application Process: Existing customers can apply online or through the mobile app with minimal documentation required.

Interest Rates and Terms: The loan fee is a flat $5, with repayment due in three equal monthly installments.

8. Regions Bank

Product: Regions Ready Advance Loan

Overview: Regions Bank offers the Ready Advance Loan, which provides quick access to funds ranging from $50 to $500. Funds are usually available immediately upon approval.

Application Process: The application can be completed online or in a branch. Existing Regions customers with an active checking account can apply with minimal documentation.

Interest Rates and Terms: The loan carries a $10 monthly fee for every $100 borrowed. Repayment is typically due within 30 days, but terms can vary.

Alternatives to Quick Loans

Given the high costs and risks associated with quick loans, it is crucial for consumers to consider alternative options for managing financial emergencies:

  • Personal Loans from Credit Unions: Credit unions often offer small personal loans at lower interest rates compared to payday lenders. These loans typically have more manageable repayment terms and are available to members.
  • Credit Card Cash Advances: While still expensive, credit card cash advances usually have lower interest rates than quick loans. Borrowers can access cash quickly through their credit cards, although fees and interest will apply.
  • Installment Loans: Some lenders offer installment loans with longer repayment periods and lower interest rates. These loans can provide immediate funds while giving borrowers more time to repay.
  • Emergency Assistance Programs: Many communities have non-profit organizations and government programs that provide financial assistance to individuals in crisis. These programs can offer grants or low-interest loans to help cover emergency expenses.
  • Borrowing from Friends or Family: While not always feasible, borrowing from friends or family can be a less expensive alternative to quick loans. It is essential to approach such arrangements with clear terms to avoid straining relationships.

Conclusion

Quick loans offer a fast and convenient solution for individuals facing urgent financial needs. However, the high-interest rates and short repayment terms pose significant risks, potentially leading to a cycle of debt. Consumers must weigh the benefits and drawbacks carefully and explore alternative options before committing to a quick loan.

Understanding the regulations and consumer protections in place can help borrowers make informed decisions and avoid predatory lending practices. By considering all available options and seeking financial advice, individuals can find the most suitable solution for their needs while minimizing the risk of financial hardship.

PUBLICIDADE

11 Signs You May Have Kidney Disease

PUBLICIDADE

Kidney disease, often termed chronic kidney disease (CKD), is a progressive condition where the kidneys gradually lose their function over time. This can lead to serious health complications, as the kidneys play a crucial role in filtering waste products from the blood, balancing bodily fluids, regulating blood pressure, and contributing to the production of red blood cells.

Early detection is crucial for managing the disease and preventing further complications. Here are ten signs that may indicate you have kidney disease:

1. Fatigue and Weakness

One of the early signs of kidney disease is feeling tired and weak. This is because kidneys are responsible for filtering waste from the blood. When they are not functioning properly, waste builds up in the body, leading to fatigue.

Additionally, kidney disease can cause anemia, a condition where the body has a lower than normal count of red blood cells. This also contributes to feelings of weakness and tiredness because there are not enough red blood cells to carry oxygen to the muscles and brain, leading to a general sense of fatigue.

PUBLICIDADE

2. Swelling (Edema)

Swelling in the legs, ankles, feet, face, and hands can be a sign of kidney disease. This occurs because the kidneys are not able to remove excess fluid and sodium from the body, leading to fluid retention. This swelling, known as edema, can be particularly noticeable in the lower extremities due to gravity.

In severe cases, this can cause a significant increase in body weight and can be uncomfortable and debilitating. Persistent swelling should be evaluated by a healthcare provider as it may indicate worsening kidney function.

3. Changes in Urination

Kidney disease can cause noticeable changes in urination, which may include:

  • Increased frequency: Particularly at night (nocturia), which can disrupt sleep.
  • Decreased frequency: Producing less urine than usual despite adequate fluid intake.
  • Foamy urine: Excessive bubbles in the urine can indicate proteinuria, a condition where protein is present in the urine.
  • Dark or discolored urine: This may signal blood in the urine, a potential indicator of kidney problems.
  • Painful urination: This could be a sign of a urinary tract infection or kidney stones, both of which can impact kidney function.

These changes are often among the earliest signs of kidney disease and should not be ignored.

PUBLICIDADE

4. Shortness of Breath

Kidneys help balance the levels of minerals and fluids in the body. When they are not functioning correctly, fluid can build up in the lungs, causing shortness of breath. This condition, known as pulmonary edema, can make even simple activities like walking or climbing stairs challenging.

Additionally, anemia associated with kidney disease can lead to decreased oxygen delivery to tissues, contributing to this symptom. Patients may feel out of breath with minimal exertion or even at rest.

5. High Blood Pressure

The kidneys play a crucial role in regulating blood pressure. They do this by controlling the amount of fluid in the blood and releasing the hormone renin, which regulates blood pressure. Damaged kidneys are less effective at controlling blood pressure, which can lead to hypertension.

Conversely, high blood pressure can also damage the kidneys, creating a vicious cycle. Uncontrolled high blood pressure can accelerate the progression of kidney disease and lead to other complications, such as heart disease and stroke.

PUBLICIDADE

6. Persistent Itching

Kidney disease can lead to a build-up of waste products in the blood, causing persistent itching (pruritus). This is because the kidneys are not effectively filtering these waste products out of the body.

Additionally, imbalances in minerals such as calcium and phosphorus can contribute to skin irritation and itching. This itching can be widespread or localized and can be severe enough to interfere with sleep and daily activities.

7. Metallic Taste in Mouth and Ammonia Breath

A build-up of waste products in the blood (uremia) can lead to a metallic taste in the mouth and breath that smells like ammonia. This can affect appetite and cause weight loss.

Many patients describe this as having a constant bad taste in their mouth, which can lead to a decreased interest in eating, further contributing to weight loss and malnutrition. Proper nutritional support and management are crucial for patients experiencing these symptoms.

8. Nausea and Vomiting

Toxins that accumulate due to reduced kidney function can cause nausea and vomiting. This is often seen in more advanced stages of kidney disease and can significantly affect a person’s quality of life and nutritional status.

The build-up of waste products in the blood, particularly urea, can irritate the gastrointestinal tract, leading to discomfort and the urge to vomit. Persistent nausea and vomiting can result in loss of appetite, dehydration, and weight loss, all of which can exacerbate the underlying kidney issues.

Managing these symptoms often requires dietary changes and medications prescribed by a healthcare provider.

9. Trouble Concentrating

Anemia and the build-up of toxins can also affect brain function, leading to trouble concentrating, memory issues, and dizziness. This condition, often referred to as “brain fog,” can make it difficult to perform daily tasks and affect overall cognitive function.

Patients may find it challenging to focus on work, engage in conversations, or remember simple tasks. The lack of oxygen-rich blood and the presence of waste products in the bloodstream impact brain activity, highlighting the importance of addressing anemia and other contributing factors in kidney disease management.

10. Your Skin Becomes Dry And Itchy

A normal and healthy pair of kidneys perform many tasks for the body. They help in removing toxins and wastes from the body, maintain the right amount of minerals in the body, promote healthy and strong bones, and make red blood cells. Apart from all these functions, they also help in maintaining healthy and hydrated skin.

Thus, dry and itchy skin is an indication that your kidneys are no longer able to maintain the right balance of minerals and nutrients in the body. Itching usually happens when there is an accumulation of uric acid and other waste products and build-up on the skin.

11. Pain

Pain in the back or sides where the kidneys are located can be a sign of kidney disease. This pain can indicate kidney stones, a kidney infection (pyelonephritis), or other kidney-related issues.

Polycystic kidney disease (PKD), a genetic disorder, can cause large, fluid-filled cysts on the kidneys, leading to chronic pain and discomfort. The pain associated with kidney stones is often severe and can come in waves, radiating to the lower abdomen and groin.

If you experience persistent or severe pain in these areas, it is important to seek medical attention for appropriate diagnosis and treatment.

Conclusion

Recognizing the signs and symptoms of kidney disease early can significantly improve the chances of effective management and slow the progression of the disease. If you experience any of these symptoms, it is crucial to consult a healthcare provider for a thorough evaluation.

Early diagnosis and intervention can help manage the disease, maintain kidney function, and prevent complications. Maintaining a healthy lifestyle is vital for supporting kidney health. This includes:

  • Balanced Diet: Eating a diet rich in fruits, vegetables, whole grains, and lean proteins while limiting salt, sugar, and processed foods can help manage blood pressure and blood sugar levels, reducing the strain on your kidneys.
  • Regular Exercise: Engaging in regular physical activity can help control blood pressure, improve heart health, and manage weight, all of which are beneficial for kidney health.
  • Hydration: Staying well-hydrated helps the kidneys clear toxins from the body. However, if you have kidney disease, your doctor may recommend a specific fluid intake to manage fluid balance.
  • Avoiding Smoking and Limiting Alcohol: Smoking and excessive alcohol consumption can damage the kidneys and increase the risk of kidney disease.
  • Monitoring Blood Pressure and Blood Sugar: Regularly checking and managing blood pressure and blood sugar levels can prevent kidney damage, especially for individuals with hypertension or diabetes.

For those at higher risk, such as individuals with a family history of kidney disease, diabetes, hypertension, or other underlying health conditions, regular check-ups, blood tests, and urine tests are crucial for early detection and management of kidney disease.

In summary, being aware of the symptoms of kidney disease and taking proactive steps to maintain kidney health can significantly impact overall well-being. If you suspect any issues with your kidneys, seek medical advice promptly to ensure the best possible outcome.

PUBLICIDADE

15 Cancer Symptoms You Shouldn’t Ignore

PUBLICIDADE

Cancer remains one of the leading causes of death worldwide, with early detection playing a pivotal role in improving treatment outcomes and survival rates. While many are familiar with common symptoms such as lumps, persistent coughs, or changes in bowel habits, there exists a myriad of lesser-known signs that individuals often overlook.

Recognizing these subtle indicators can facilitate timely intervention and potentially life-saving treatment. Here are 15 often ignored signs of cancer that warrant attention:

1.Unexplained Weight Loss

One of the warning signs that cancer may be growing in your body is unexplained weight loss. While weight loss can occur due to various reasons, such as dietary changes or increased physical activity, sudden and unintentional weight loss without apparent cause should raise concerns. Cancer-related weight loss can result from factors like changes in metabolism or loss of appetite due to tumor growth.

2. Chronic Fatigue

Persistent fatigue that extends beyond normal tiredness and does not improve with rest warrants evaluation, as it could signify an underlying medical condition, including cancer. Chronic fatigue associated with cancer often persists despite adequate sleep and may significantly impact daily functioning. Individuals experiencing unexplained and prolonged fatigue should seek medical assessment to rule out underlying health concerns.

PUBLICIDADE

3. Persistent Headaches

While headaches are a common ailment, persistent and severe headaches that do not respond to over-the-counter medications may indicate an underlying health issue, including cancer. Brain tumors or cancers that have metastasized to the brain can present with persistent headaches accompanied by other neurological symptoms, necessitating thorough evaluation by healthcare professionals.

4. Difficulty Swallowing

Difficulty swallowing, medically known as dysphagia, can be a symptom of various cancers affecting the gastrointestinal tract, including the throat, esophagus, or stomach. Individuals experiencing persistent difficulty swallowing, especially accompanied by pain or discomfort, should undergo further investigation to identify potential underlying causes, including cancer.

5. Changes in Skin

Changes in the skin, including the appearance of new moles, changes in existing moles, or alterations in skin pigmentation, should not be ignored, as they could indicate the presence of skin cancer, particularly melanoma. Regular skin examinations and prompt evaluation of suspicious lesions are crucial in detecting skin cancer at an early stage when treatment is most effective.

6. Chronic Heartburn or Indigestion

While occasional heartburn or indigestion is common, persistent symptoms that do not improve with lifestyle modifications or over-the-counter medications may warrant medical evaluation. Chronic heartburn or indigestion may be associated with gastrointestinal cancers, such as esophageal or stomach cancer, highlighting the importance of prompt assessment for accurate diagnosis and management.

PUBLICIDADE

7. Changes in Bowel Habits

Alterations in bowel habits, including persistent diarrhea, constipation, or changes in stool caliber, may indicate underlying gastrointestinal issues, including colorectal cancer. Individuals experiencing persistent changes in bowel habits should undergo appropriate screening and diagnostic tests to identify potential underlying causes, including cancer.

8. Chronic Cough

While coughing is often attributed to respiratory infections or allergies, a chronic cough that persists for several weeks or worsens over time should prompt further evaluation, as it could be indicative of lung cancer or cancer metastatic to the lungs. Individuals with persistent cough accompanied by other respiratory symptoms should undergo comprehensive assessment to determine the underlying cause.

9. Frequent Infections or Fevers

Frequent infections or fevers that persist despite appropriate medical treatment may indicate an underlying immunological disorder, including leukemia or lymphoma. Persistent fever, particularly in the absence of an apparent source of infection, should prompt medical evaluation to rule out potential underlying malignancies.

10. Changes in Urination

Changes in urinary habits, including increased frequency, urgency, blood in the urine, or changes in urinary flow, may indicate underlying genitourinary issues, including bladder or kidney cancer. Individuals experiencing persistent changes in urinary habits should undergo thorough evaluation to identify potential underlying causes, including cancer.

PUBLICIDADE

11. Persistent Back Pain

Persistent and unexplained back pain, particularly if it does not improve with conservative measures or is associated with other concerning symptoms, may warrant further investigation for underlying malignancies, including bone, pancreatic, or ovarian cancer. Individuals experiencing persistent back pain should undergo comprehensive evaluation to determine the underlying cause and initiate appropriate management.

12. Difficulty Breathing

Difficulty breathing or shortness of breath that persists or worsens over time may indicate underlying respiratory issues, including lung cancer or cancer metastatic to the lungs. Individuals experiencing persistent respiratory symptoms should undergo thorough evaluation to identify potential underlying malignancies and initiate appropriate management.

13. Unexplained Bleeding

Unexplained bleeding, such as bleeding between menstrual cycles, blood in the stool, or bleeding from the rectum, should not be ignored, as it could indicate underlying gastrointestinal or gynecological issues, including colorectal, cervical, or uterine cancer. Prompt evaluation of unexplained bleeding is crucial in identifying potential underlying malignancies and facilitating timely intervention.

14. Changes in Breast Appearance

Changes in the size, shape, or appearance of the breast, nipple, or areola, including lumps, dimpling, or nipple discharge, should prompt further evaluation for underlying breast issues, including breast cancer. Regular breast self-examinations and clinical breast examinations are essential in detecting breast abnormalities at an early stage when treatment is most effective.

15. Persistent Fatigue

Persistent and unexplained fatigue that interferes with daily functioning should not be ignored, as it could indicate underlying health concerns, including cancer. Individuals experiencing persistent fatigue should undergo comprehensive evaluation to identify potential underlying causes, including malignancies such as leukemia or lymphoma.

Conclusion

This list of warning signs of cancer above is not exhaustive. To be sure, at the first sign of any of these symptoms or any unusually persistent discomfort or change in your body, see your doctor right away.

While there’s no guarantee that you can keep cancer at bay, it wouldn’t hurt to reduce your risk. Eat a healthy diet, keep a daily exercise routine, practice good sleep hygiene, drink plenty of water, and supplement with antioxidants like resveratrol.

Lastly, keep in mind that stress hormones can resist anoikis, a body program that kills disease cells and prevents the spread of cancer. So reduce stress in your life as much as possible.

PUBLICIDADE

If You Pee During Showering, See This Right Now!

PUBLICIDADE

Do you have the habit of peeing while taking a shower? If yes, great. If not, maybe you should include the habit in your daily routine. Peeing During Showering is not at all unhygienic and actually, it’s very good for the planet.

It’s not just for the liberating and rebellious adrenaline rush you may or may not have, but because this simple attitude can help save our planet. Let’s analyze the situation. Even mathematically, it’s a simple calculation.

Every time you pee, you flush (or at least you’re supposed to) in the toilet. While feces require a considerable amount of water to send them down the drain, urine, on the other hand, hardly needs any encouragement for such a journey.

Even though some more modern toilets have adapted flushes that consume water as needed, most still lack this technology, and daily, a lot of water is wasted.

PUBLICIDADE

And as we know, water is essential for our life and has become an increasingly scarce resource. Today, there are already thousands of people suffering from water scarcity, and if we continue at this rate, very soon, the number of people without water in the world will increase drastically.

Benefits of Peeing During Showering:

If someone admits to peeing in the shower, at best they’ll get a weird look. But seriously, peeing in the shower is no problem at all and saves a lot of water.

Those who propose this practice estimate that many of us use up to 15 liters of water every day just by flushing. If you multiply that by the population and the days of the year, it’s literally thousands of liters of water wasted. Besides being expensive in the long run, it’s bad for the environment.

Sure, there are some low-flow toilets out there, but they still don’t make much of a difference in the water consumption scenario. Since most people shower at least once a day, it makes sense to pee and wash up at the same time.

PUBLICIDADE

And there’s a double bonus: you use less toilet paper and save trees and your wallet! Here are some ways you can use your urine, and you’ll also find out why it’s not a bad idea to pee in the shower.

SAVES WATER:

A normal adult urinates at least seven times a day, spending about 49 liters in total on flushing. Assuming you take at least one shower a day, adding up the number of days in a year, you’re expected to save a good amount of water.

IT’S MORE HYGIENIC:

It’s cleaner to rinse away pee residue directly with water than with toilet paper. Everybody Does It: Although many grimace when talking about it, 80% of people admit to having done it at some point in their lives. So, what’s the problem?

TREATS SKIN ISSUES:

If you have a skin problem on your feet or legs, like eczema, a bit of urine might help. Urea, present in urine, is an active ingredient in many dermatological care creams and oils. This is because it can balance the skin’s pH and combat sensitivity and dryness.

PUBLICIDADE

HELPS AGAINST FUNGI:

For those who don’t know, urine has antifungal properties. Many people have fungal and bacterial feet. And one of the most effective ways to treat the problem is by applying a bit of fresh urine.

You’ll be surprised by the results, as the tactic is so effective that within two days, the fungi disappear. To avoid odor and mess in the shower, try to pee as close to the drain as possible.

DISINFECTS WOUNDS:

Yes, you read that right: urine can disinfect wounds. If you get hurt and your first aid kit isn’t handy, you can clean your wounds with fresh urine. Besides cleaning, it soothes the tissue and relieves pain.

You can even use someone else’s pee, but only if the “volunteer” isn’t infected with anything. Of course, you should always see a doctor when the injury is serious. Well, who would have thought pee could be so useful? There are also ways to use it outside the body, such as grass fertilizer.

So many taboos have settled in our lives, leaving so much wisdom forgotten. But perhaps, you’ll remember the shower tip, at least this one is worth considering. Let’s be eco-friendly, yet squeaky clean!

PUBLICIDADE