How to Amigurumi Crochet for Beginners

PUBLICIDADE

Learning anything new is never really that easy but in terms of picking up a simple hobby, crocheting is pretty easy to learn. In addition to that, amigurumis are a great way to start off your crocheting hobby especially because amigurumi projects can often be pretty short and simple, as opposed to crocheting bigger items like blankets and garments.

Is amigurumi suitable for beginners?

Crocheting amigurumi is the most popular means of creating stuffed toys as it’s very easy to do, quick, and can be completed at home. This is a hobby that you can do alone. You do not have to be with anyone else when you crochet. So it’s perfect for beginners, but it’s also a great choice for those who want to learn how to crochet. All you need to start off with is a hook and some thread. There are also plenty of crochet tutorials available online and free patterns to test out.

How to Crochet: Amigurumi Basics

Amigurumi projects are cute and fun to make, but if you don’t know how to crochet, you need to learn the basics. In this instructable, I will show you How To:

PUBLICIDADE
  • read a pattern,
  • select yarn and understand the labels
  • select the right crochet hook (conversion chart included) and,
  • complete many of the basic stitches required to make your own project.
  • and more.

All stitches shown, have been broken down into easy to follow steps; with both written instructions and photos.

Step 1: Crochet: Tools & Materials

Crochet Hook: (size should be listed on your project pattern). Each crochet hook is labeled with a letter and/or the size in mm’s. Refer to the conversion chart (photo 2) for more information.

Yarn: (The type/size of yarn should be listed on your project pattern). Refer to photo’s 3, 4 & 5 for more information about yarn labels.

Small safety pin or stitch marker: When crocheting in rounds, your project will grow more like a spiral, and it can be difficult to see where a round starts and ends. By using a safety pin, you can mark the first stitch of each round to keep track of where you start and finish each round.

PUBLICIDADE

100% Polyester Fiber Fill: In most cases, you will need to stuff your Amigurumi Crochet project after its been completed. 100% Polyester fiber fill is the best material to use, as it does not retain water when you need to wash and dry your project.

Yarn Needle: After crocheting your project, you’ll have loose yarn ends that need to be woven (hidden) into your stitches to prevent your project from falling apart. A yarn needle is therefore needed. It has a larger eye (where the yarn gets threaded into), and the end is usually rounded instead of sharp and pointed like a traditional sewing needle.

Step 2: Crochet: Slip Knot, Chain Stitch, Terms & Abbreviations

Most crochet projects will either begin with a slip knot and chain stitching, or will use an adjustable “Magic Ring”.

PUBLICIDADE

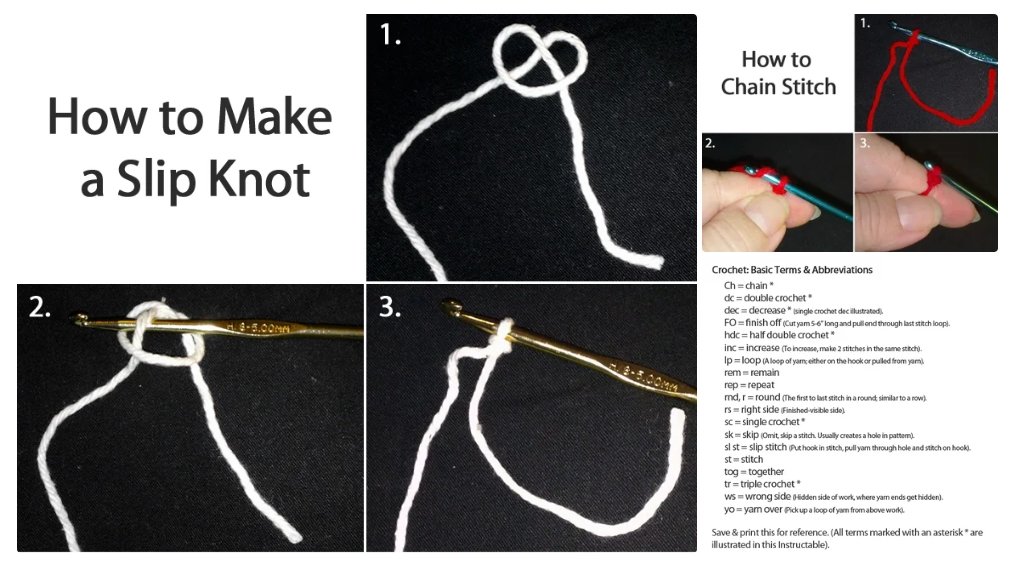
How to Make a Slip Knot (refer to photo 1):

  • Step 1: Arrange the yarn like shown (so that it resembles a pretzel). 🙂
  • Step 2: Pick up the yarn like shown.
  • Step 3: Pull tight to complete the Slip knot (like shown).

How to Make a Chain Stitch (refer to photo 2):

  • Step 1: Begin with a Slip Knot
  • Step 2: Pick up the yarn (from the ball), like shown.
  • Step 3: Pull the yarn through the loop on the crochet hook.

That’s all there is to creating a chain stitch. Repeat Steps 2 – 3 for the number of chain stitches your pattern indicates.

Crochet Terms & Abbreviations:

Refer to image 3 for the Basic Terms and Abbreviations used in Crochet Patterns (in alphabetical order).

Step 3: Crochet Stitches: Single, Increase, Decrease

Unless otherwise stated (in your pattern), when you put your crochet hook into a stitch, you are doing so under BOTH loops.

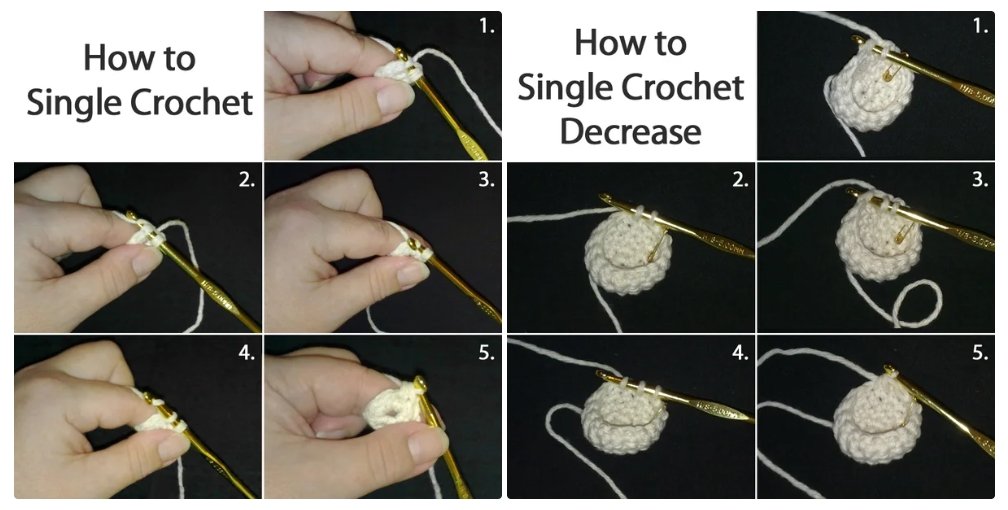
How to Single Crochet, sc (refer to image 1)

  • Step 1: Put the hook into first stitch, like shown.
  • Step 2: Draw the yarn (from the long end to the ball), like shown.
  • Step 3: Pull the yarn through the first stitch, like shown (2 stitches remain on hook).
  • Step 4: Yarn over (pull a loop of yarn from above), like shown.
  • Step 5: Pull the yarn through both loops on the crochet hook, like shown.

You have created ONE single crochet.

How to Single Crochet Increase, sc inc

To single crochet increase, create 2 single crochets (one after another), in the same stitch.

How to Single Crochet Decrease, sc dec (refer to image 2)

  • Step 1: Beginning just like a single crochet, put the hook into the first stitch, like shown.
  • Step 2: Pull a loop of yarn through the hole, like shown (2 loops remain on hook).
  • Step 3: Put hook into next stitch, like shown.
  • Step 4: Pull a loop of yarn through the hole, like shown (3 loops remain on hook).
  • Step 5: Pull a loop of yarn (yarn over), through the 3 loops on the hook, like shown.

This creates a decrease, as you’ve used up 2 stitches and are left with one.

Step 4: Crochet Stitches: Double Crochet

Unless otherwise stated (in your pattern), when you put your hook into a stitch, you are doing so under BOTH loops.

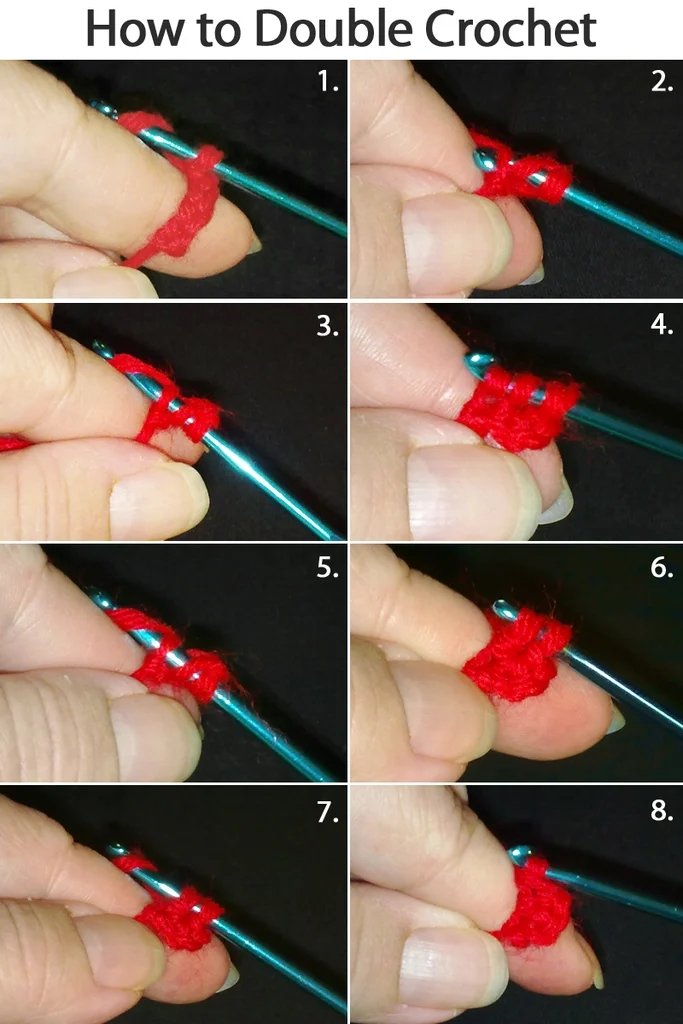
How to Double Crochet, dc (refer to image)

  • Step 1: Draw the yarn (from the long end leading to the ball), like shown.
  • Step 2: Put the hook into stitch (indicated in your pattern), like shown.
  • Step 3: Draw the yarn (from the long end leading to the ball), like shown.
  • Step 4: Pull yarn through the first stitch (3 stitches remain on the hook), like shown.
  • Step 5: Draw the yarn (from the long end leading to the ball), like shown.
  • Step 6: Pull the yarn through 2 loops on the hook, like shown (2 stitches will remain on hook).
  • Step 7: Draw the yarn again, (from the long end leading to the ball), like shown.
  • Step 8: Pull the yarn through the 2 loops on the hook, like shown. One loop will remain on the hook.

You have now completed ONE, Double Crochet stitch.

Step 5: Crochet Stitches: Half Double Crochet

Unless otherwise stated (in your pattern), when you put your hook into a stitch, you are doing so under BOTH loops.

How to Half Double Crochet, hdc (refer to image)

  • Step 1: Draw the yarn (from the long end leading to the ball), like shown.
  • Step 2: Put the hook into stitch (indicated in your pattern), like shown.
  • Step 3: Draw the yarn (from the long end leading to the ball), like shown.
  • Step 4: Pull yarn through the first stitch (3 stitches remain on the hook), like shown.
  • Step 5: Draw the yarn (from the long end leading to the ball), like shown.
  • Step 6: Pull the yarn through all 3 loops on the hook, like shown (1 stitch will remain on hook).

You have now completed ONE, Half Double Crochet stitch.

Step 6: Crochet Stitches: Triple Crochet

Unless otherwise stated (in your pattern), when you put your hook into a stitch, you are doing so under BOTH loops.

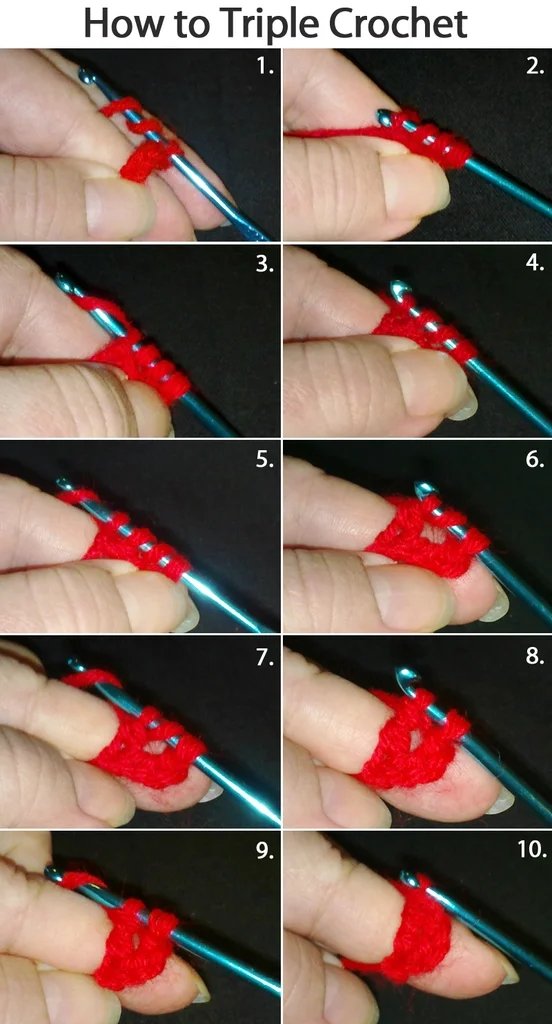
How to Triple Crochet, tr (refer to image)

  • Step 1: Draw the yarn, twice (from the long end leading to the ball), like shown.
  • Step 2: Put the hook into the stitch (indicated in your pattern), like shown.
  • Step 3: Draw the yarn (from the long end leading to the ball), like shown.
  • Step 4: Pull the yarn through the first stitch (4 loops remain on the hook), like shown.
  • Step 5: Draw the yarn again, (from the long end leading to the ball), like shown.
  • Step 6: Pull the yarn through 2 loops on your hook, like shown (3 loops remain on hook).
  • Step 7: Draw the yarn again, (from the long end leading to the ball), like shown.
  • Step 8: Pull the yarn through 2 loops on your hook, like shown (2 loops remain on hook).
  • Step 9: Draw the yarn one last time, (from the long end leading to the ball), like shown.
  • Step 10: Pull the yarn through the remaining 2 loops on your hook, like shown. One loop remains on the hook.

You have now completed ONE, Triple Crochet stitch. If you like this instructable and/or want to see a tutorial for other crochet stitches, let me know in the comments.

PUBLICIDADE

Cómo tejer Bolso a crochet fácil en cualquier tamaño

PUBLICIDADE

Aprende a tejer un bolso a crochet o ganchillo súper fácil con el material que tú quieras. El crochet no es un pasatiempo solo para abuelitas jubiladas, es una manualidad, o una forma de arte, que está volviéndose cada vez más popular.

Tejer a crochet es una actividad práctica y creativa y puede ser una manera excelente de ser productivo mientras te pones al corriente en Netflix en los días fríos y lluviosos. Aquí te proporcionamos instrucciones para elaborar un bolso simple con técnicas básicas de crochet. Este patrón puede adaptarse a casi cualquier tamaño y estilo.

Cómo tejer Bolso a crochet fácil en cualquier tamaño

Tejer bolsos a crochet es una forma divertida y creativa de crear accesorios únicos. Aquí tienes una guía paso a paso para hacer un bolso a crochet básico. Puedes ajustar los detalles según tu diseño preferido. Aquí tienes cinco ideas para bolsos a crochet, junto con una breve guía de cómo hacerlos:

1. Bolsas redondas de crochet

PUBLICIDADE

Materiales:

  • Hilo: Puedes usar algodón, acrílico, o cualquier hilo que te guste para el bolso.
  • Ganchillo: El tamaño del ganchillo dependerá del grosor del hilo. Consulta las recomendaciones del fabricante.
  • Aguja de coser lana (si planeas añadir un forro o coser detalles).
  • Marcadores de punto (opcional, pero útil para seguir el patrón).
  • Cinta métrica o regla.

Instrucciones:

1. Preparación:

  • Elegir el hilo y el ganchillo: Lee las recomendaciones en la etiqueta del hilo para seleccionar el tamaño adecuado del ganchillo.

2. Base del bolso:

PUBLICIDADE
  • Anillo mágico: Comienza con un anillo mágico para hacer el centro del bolso. Haz 6 puntos bajos dentro del anillo (esto es la base).
  • Aumento en la primera vuelta: Trabaja 2 puntos bajos en cada punto de la vuelta anterior. Tendrás 12 puntos en total.
  • Aumentos continuos: En cada vuelta subsecuente, aumenta de la siguiente manera:
    • Vuelta 1: (1 punto bajo, aumento) repite hasta el final de la vuelta.
    • Vuelta 2: (2 puntos bajos, aumento) repite hasta el final de la vuelta.

Continúa aumentando hasta alcanzar el tamaño deseado para la base del bolso.

3. Cuerpo del bolso:

Una vez que la base tenga el tamaño deseado, comienza a trabajar en rondas sin hacer aumentos. Así, el bolso crecerá hacia arriba en lugar de hacia los lados.
Puedes hacer el cuerpo del bolso del alto que prefieras. Cambia de color si deseas agregar detalles o hacer un diseño más interesante.

4. Borde y asas:

PUBLICIDADE
  • Borde: Trabaja una vuelta de puntos altos o puntos en relieve para darle un acabado bonito al borde superior del bolso.
  • Asas: Puedes hacer asas a crochet o usar asas prehechas. Para hacer asas a crochet:
    • Haz una cadena de la longitud deseada para la asa.
    • Trabaja en puntos bajos o medios puntos altos a lo largo de la cadena para darle más firmeza.
    • Une las asas al bolso con una aguja de coser lana o cose directamente con el hilo del bolso.

5. Acabado:

  • Forro (opcional): Si deseas añadir un forro, mide el interior del bolso y corta una tela que se ajuste. Cóselo al interior del bolso para darle un acabado más profesional y duradero.
  • Detalles adicionales: Puedes añadir un botón, broche, o cualquier otro adorno que te guste.

2. Bolsos cuadrados de crochet

Materiales:

  • Hilo: Puedes usar algodón, acrílico, o el hilo que prefieras para el bolso.
  • Ganchillo: El tamaño del ganchillo debe coincidir con el grosor del hilo. Consulta las recomendaciones del fabricante.
  • Aguja de coser lana (para coser los detalles si es necesario).
  • Marcadores de punto (opcional, pero útil para seguir el patrón).
  • Cinta métrica o regla.

Instrucciones:

1. Preparación:

  • Elegir el hilo y el ganchillo: Escoge un hilo y un ganchillo que se ajusten al proyecto. Lee las recomendaciones del fabricante para seleccionar el tamaño adecuado del ganchillo.

2. Base del bolso:

  • Hacer una cadeneta: Comienza haciendo una cadena de la longitud deseada para el lado del bolso. El número de cadenas debe ser múltiplo de 2 o 3, dependiendo del patrón que quieras usar (por ejemplo, 20 cadenas para un bolso pequeño).
  • Primera fila: Trabaja puntos bajos o medios puntos altos en cada cadena, dependiendo de la textura que prefieras.
  • Aumentos en las esquinas: Para darle forma cuadrada al bolso, necesitarás hacer aumentos en las esquinas. Para hacer esto, al final de cada fila, haz un aumento (dos puntos en el mismo punto) en cada esquina.

3. Cuerpo del bolso:

  • Continuar en rondas: Una vez que tengas la base cuadrada, continúa trabajando en rondas, sin aumentos, hasta alcanzar la altura deseada para el bolso.
  • Cambiar de color (opcional): Puedes cambiar de color en diferentes filas para hacer rayas o patrones.

4. Borde del bolso:

  • Borde superior: Trabaja una vuelta de puntos altos, medios puntos altos, o puntos en relieve alrededor del borde superior del bolso para darle un acabado limpio y profesional.
  • Borde inferior: Si deseas, también puedes trabajar un borde en la parte inferior del bolso para darle más estabilidad.

5. Asas del bolso:

  • Asas a crochet: Puedes hacer asas a crochet siguiendo estos pasos:
    Hacer una cadeneta: Comienza haciendo una cadena de la longitud deseada para la asa.
  • Trabajar en filas: Trabaja puntos bajos o medios puntos altos a lo largo de la cadena. Puedes hacer el ancho que prefieras para la asa.
  • Unir al bolso: Une las asas al bolso usando una aguja de coser lana o cose directamente con el hilo del bolso.
    Asas prehechas: También puedes usar asas prehechas y coserlas al bolso.

6. Acabado:

  • Forro (opcional): Si deseas añadir un forro, mide el interior del bolso y corta una tela que se ajuste. Cóselo al interior del bolso para darle un acabado más profesional.
  • Detalles adicionales: Puedes añadir botones, broches, o adornos adicionales si lo deseas.

3. Bolsas de crochet a mano

Materiales:

  • Hilo: Puedes usar algodón, acrílico o cualquier hilo que te guste para el bolso.
  • Ganchillo: El tamaño del ganchillo debe coincidir con el grosor del hilo. Consulta las recomendaciones del fabricante.
  • Aguja de coser lana (para coser los detalles si es necesario).
  • Marcadores de punto (opcional, pero útil para seguir el patrón).
  • Cinta métrica o regla.
  • Cierre (opcional): Puedes agregar un cierre o broche para mayor seguridad.

Instrucciones:

1. Preparación:

  • Elegir el hilo y el ganchillo: Escoge un hilo adecuado para el bolso y el tamaño del ganchillo que corresponda. Consulta las recomendaciones del fabricante para el tamaño adecuado.

2. Base del bolso:

  • Hacer una cadeneta: Comienza haciendo una cadena con el largo deseado para el bolso. Por ejemplo, si quieres un bolso de mano de 25 cm de largo, haz una cadena de 25 cm + unos 10 cm adicionales para el margen de error.
  • Trabajar en filas: Trabaja en la primera fila usando puntos bajos, medios puntos altos o puntos altos, según tu preferencia. Por ejemplo, si estás usando puntos bajos, trabaja 1 punto bajo en cada cadena.
  • Continuar con filas: Sigue trabajando en filas hasta alcanzar el alto deseado del bolso. Cada fila puede ser igual o puedes cambiar de punto para añadir textura. Por ejemplo, podrías alternar entre puntos bajos y medios puntos altos.

3. Cuerpo del bolso:

  • Formar el cuerpo: Una vez que hayas alcanzado la altura deseada, pliega el trabajo por la mitad para formar el cuerpo del bolso. Une los bordes laterales con puntos bajos o con una puntada de costura para formar los laterales del bolso.
  • Borde superior: Trabaja una vuelta adicional de puntos en relieve, puntos altos o medios puntos altos alrededor del borde superior del bolso para darle un acabado más profesional.

4. Asas del bolso:

  • Asas a crochet: Para hacer asas a crochet, sigue estos pasos:
    • Hacer una cadeneta: Comienza haciendo una cadena de la longitud deseada para la asa (por ejemplo, 60 cadenas).
    • Trabajar en filas: Trabaja puntos bajos o medios puntos altos a lo largo de la cadena. Puedes hacer el ancho que prefieras para la asa.
    • Unir al bolso: Una vez que termines la asa, únelas al bolso en los puntos deseados, usando una aguja de coser lana o cose directamente con el hilo del bolso.
  • Asas prehechas: Alternativamente, puedes usar asas prehechas y coserlas al bolso.

5. Acabado:

  • Cierre (opcional): Si deseas agregar un cierre, cóselo al borde superior del bolso. Puedes usar un cierre de cremallera, botón o broche magnético.
  • Forro (opcional): Para un acabado más pulido, puedes añadir un forro de tela. Mide el interior del bolso, corta la tela y cósela al interior del bolso.
  • Detalles adicionales: Puedes añadir adornos, como borlas, botones decorativos o aplicaciones, para personalizar tu bolso.

¡Y eso es todo! Con esta guía básica, puedes crear un bolso de mano a crochet personalizado y único. No dudes en experimentar con diferentes puntos y colores para hacer un bolso que realmente te guste. ¡Disfruta del proceso!

PUBLICIDADE

How to Crochet a Quick & Easy Rug

PUBLICIDADE

Crocheting a rug involves several steps, from selecting the right materials to finishing the project. Here’s a detailed guide on how to crochet a basic rug, covering different types for various needs. This will give you a good foundation whether you’re making a circular, rectangular, or oval rug.

How to Crochet a Quick & Easy Rug:

Crochet rugs are a fantastic way to add a personal touch to your home decor. They come in a variety of styles and techniques. Here are five popular types of crochet rugs and instructions on how to make them:

1. Circular Rug

Materials:

PUBLICIDADE
  • Yarn (bulky or chunky recommended)
  • Crochet hook (size recommended on yarn label)
  • Scissors
  • Yarn needle

Instructions:

  • Magic Ring: Create a magic ring by making a loop with the yarn and pulling the working yarn through it to form a knot. Alternatively, you can start with a chain of 4 and join to form a ring.
  • Round 1: Into the magic ring (or chain ring), work 6 single crochet (sc) stitches. Pull the ring tight to close the center.
  • Round 2: Work 2 sc in each stitch around (12 stitches total).
  • Round 3: 1 sc in the first stitch, 2 sc in the next stitch — repeat around (18 stitches total).
  • Round 4: 1 sc in each of the next 2 stitches, 2 sc in the next stitch — repeat around (24 stitches total).
  • Rounds 5 and beyond: Continue increasing by adding an extra sc between increases as needed. For example, in Round 5, you would work 1 sc in each of the next 3 stitches, then 2 sc in the next stitch (30 stitches total). Adjust the number of stitches between increases to keep the rug flat as it grows.
  • Finish: Continue until the rug reaches the desired size. Fasten off the yarn, cut it, and use a yarn needle to weave in the ends.

2. Oval Rug

Materials:

  • Yarn (medium or bulky)
  • Crochet hook (appropriate size for yarn)
  • Scissors
  • Yarn needle

Instructions:

PUBLICIDADE
  • Foundation Chain: Chain the desired length of the oval’s width. For example, if you want a 24-inch wide rug, chain about 24 inches worth of stitches.
  • Row 1: Work 1 sc in each chain stitch across the row.
  • Row 2: Turn your work. Work 1 sc in the first stitch, 2 sc in the last stitch of the row to start forming the curve.
  • Increase Rows: Continue with 1 sc in each stitch across, increasing 1 stitch at each end of the row (e.g., 2 sc in the first and last stitches) until you reach the desired width.
  • Continue Rows: Once the width is correct, work sc rows without increasing to the desired length of the rug.
  • Finish: Fasten off and weave in all loose ends.

3. Rectangular Rug

Materials:

  • Yarn (bulky or super bulky)
  • Crochet hook (size recommended on yarn label)
  • Scissors
  • Yarn needle

Instructions:

  • Foundation Chain: Chain to the width of your rug. For example, if you want a rug that is 30 inches wide, chain about 30 inches worth of stitches (usually a multiple of the stitch pattern you’re using).
  • Row 1: Work 1 sc in each chain stitch across the row.
  • Row 2: Turn the work. Work 1 sc in each stitch across the row.
  • Increase Rows (if needed): If you need to adjust the width, you can add extra stitches at the beginning or end of each row.
  • Continue Rows: Work rows until the rug reaches the desired length.
  • Finish: Fasten off and weave in any loose ends.

4. Granny Square Rug

PUBLICIDADE

Materials:

  • Yarn (multiple colors if desired)
  • Crochet hook (size recommended on yarn label)
  • Scissors
  • Yarn needle

Instructions:

  • Start with a Slip Knot: Make a slip knot and chain 4. Join with a slip stitch to form a ring.
  • Round 1: Chain 3 (counts as first dc), work 2 dc into the ring, chain 2, 3 dc into the ring, chain 2 — repeat 3 times. Join with a slip stitch to the top of the starting chain 3.
  • Round 2: Slip stitch to the corner space, chain 3 (counts as first dc), work 2 dc, chain 2, 3 dc, chain 2 in each corner space, join with a slip stitch.
  • Round 3: Repeat the process, working 3 dc in each corner space and chain 2 between clusters.
  • Join Squares: Arrange the squares in the desired pattern and join them using a whip stitch or slip stitch method, connecting through the back loops to keep the rug flat.
  • Border (Optional): Add a border around the joined squares by working sc or a decorative stitch of your choice around the entire rug.
  • Finish: Weave in all loose ends.

5. Rag Rug

Materials:

  • Old fabric or fabric strips (1-inch wide strips recommended)
  • Crochet hook (usually larger size, like 10mm or larger)
  • Scissors
  • Yarn needle

Instructions:

  • Prepare Fabric Strips: Cut old fabric (like t-shirts or sheets) into 1-inch wide strips. Knot the ends of each strip together to make one continuous strand.
  • Foundation Chain: Chain the desired width of your rug.
  • Row 1: Work 1 sc in each chain stitch across the row.
  • Row 2 and onwards: Turn the work and sc in each stitch across. You may need to work loosely to accommodate the bulkier fabric.
  • Increase Rows (if desired): Add extra stitches at the edges of each row to maintain the shape if the fabric causes the rug to curl or pucker.
  • Finish: Fasten off and weave in all loose ends.

These detailed steps should help you create beautiful and functional crochet rugs for your home. Enjoy your crafting!

PUBLICIDADE

20 Crochet Bikini Patterns You’ll Love Making

PUBLICIDADE

Are you looking for an easy-to-make crochet top, bikini top or bralette? If so, you’ll love this roundup of patterns! Since there is a good deal of crochet bikini or bralette top patterns on the Internet, the chances are you’ll be able to find a bikini pattern that fits your style and your body type.

Since there are so many, I’ve made it easier for you to find the best crochet bikini top for you! You’ll find crochet bikinis in a range of crochet patterns in all sizes for every skill level, from beginner to expert.

So if you are just learning how to crochet a bikini top or are an experienced crocheter, I’m hoping there is a pattern for you below to make. Enjoy!

Crochet Bikini Patterns

Since there are quite a few free crochet patterns as well as paid to choose from below, you will be sure to find the perfect crocheted bikini top for you!

PUBLICIDADE

Keep on reading to learn about the supplies you’ll want to have on hand before starting one of these top patterns. Enjoy!

Supplies For Crochet Bikini Patterns

Here is what you will need to crochet a bikini:

  • Crochet Hooks: Use a crochet hook size to match your yarn. Common hook sizes for crochet bikinis are 3.5 mm (E/4), 4 mm (G/6), or 4.5 mm (7). If you require a tighter stitch, you may size down from that recommended on the yarn label.
  • Yarn: The yarn you choose should be washable and dry quickly. See below for more suggestions.
  • Scissors: A pair of sharp, small scissors for trimming ends.
  • Stitch Markers: Many bikini patterns are worked in the round, and these help keep track.
  • Tape Measure: A flexible tape measure will help you take your body measurements for accurate sizing.
  • Tapestry Needle: This is needed for weaving in ends.

What Is The Best Yarn To Crochet Bikinis?

When crocheting a bikini, choose a yarn that is suitable for getting wet. The best type of yarn for crochet bikinis is cotton yarn or a cotton blend with a small percentage of elastane. It needs to be soft, light, and dry quickly.

Here are a few things to consider when crocheting a bikini top or bottom:

PUBLICIDADE
  • Yarn Fiber: Choose yarns that can get wet without shrinking. Cotton, bamboo, and polyester blends are good options. Choose a yarn that is soft and not scratchy on the body. Avoid yarn fibers such as wool which will shrink and be fluffy and scratchy.
  • Durability: Your bikini yarn should be able to handle getting wet regularly and not stretch when wet.
  • Stretch: The addition of some Spandex or Lycra to your yarn will mean it stretches and has good recovery, so your bikini stays in shape.
  • Colorfast: Your yarn should be colorfast when wet. It is usually best to choose lighter colors.

The easiest way to determine most of these factors is to check the care label of the yarn to see if it can be washed.

The yarn you choose will depend on the look you want for the bikini and your skill level. Thicker yarns will be easier for beginners.

Best Crochet Bikini Patterns

1. The Basic Stitch Bikini

Diving right in with this glamorous bikini set, which is ideal for wearing in the tropics. Made in some fiery-toned yarn and worn in an exotic location, this bikini set would be a stunner. It would look great on any body type, and you will find lots of questions directed your way to enquire where you purchased this from.

PUBLICIDADE

2. Brallete & Lace Bikini Pattern

The white bralette brings a sense of feminity to your ensemble, while the delicate lace adds a touch of romance. The intricate lacework creates a captivating pattern, enhancing the overall beauty of the bikini and creating a stunning visual impact.

3. Summer Vibes Bikini Pattern

This versatile creation is not only perfect for the beach but also an excellent choice for upcoming music festivals during the summer season. Its trendy design adds a touch of elegance to any outfit, allowing you to embrace your inner fashionista while enjoying the warm weather and vibrant atmosphere.

4. Colorful Bikini Top Crochet Pattern

Elevate your beach style with a crocheted bikini top featuring a mesmerizing multi-colored pattern and charming ties. This exquisite creation is a testament to the artistry of crochet, combining vibrant hues and intricate stitches to deliver a unique and eye-catching design.

5. Crochet Bikini Set Pattern

The Micro Bikini Crochet is a captivating swimwear style that embraces small crochet stitches, resulting in a daring and alluring swimsuit. The designer has created this pattern using basic stitches and she shows you how to draft a pattern to fit you.

6. Bathing Suit Crochet Pattern

Get ready to make a stylish statement with the Crochet Festival Bikini in an elegant off-white color adorned with an intricate pattern. This stunning creation is designed to capture the essence of bohemian beauty and elevate your festival wardrobe to new heights.

7. Crochet Brallete Bikini

I am excited to introduce you to the Sahara Crochet Bikini Bralette/Top—a creation that not only exudes style but also promises unrivaled comfort. Treat yourself to the beauty and comfort of the Crochet Bikini Bralette, a creation that combines the art of crochet with the desire for ultimate comfort.

8. Festival Crochet Bikini Patterns

Summer evokes a myriad of delightful images: bikinis that showcase sun-kissed skin, the allure of wide-brimmed hats and sunglasses, and the refreshing indulgence of cold drinks. This bikini crochet pattern will fit in with the beach or festival circuit.

9. Wrap Bikini Crochet Patterns

Embrace the must-have essential that every girl needs – the reversible wrap bikini top. This versatile piece is designed to bring endless joy and style to your beach wardrobe. Pair it effortlessly with a flowing bohemian-style skirt for a carefree and boho-inspired look, or layer it with a crisp white blouse for a chic ensemble.

10. Crochet Swimwear Pattern

Embrace the bohemian spirit and pair this crochet festival bikini with your favorite denim shorts, flowy skirts, or vibrant kimono for a truly enchanting look. Add some accessories, such as feather earrings, beaded bracelets, or a flower crown, to complete your festival-inspired ensemble.

11. Basic Crochet Bikini

Hit the beach with some stunning crochet! This crochet bikini pattern is bound to get attention and bag lots of compliments. This pattern comes in three different sizes, and the basic design features a halter top paired with a classic cut bottom. This timeless pattern will keep you returning for it every beach season.

PUBLICIDADE