Crochet is a craft technique that involves using a hooked needle to create fabric by interlocking loops of yarn or thread. It is similar to knitting, but instead of using two needles, crochet uses a single hook.
With crochet, you can create a wide variety of items such as blankets, scarves, hats, and even intricate lacework. It’s a popular hobby enjoyed by many people around the world. The options are endless! We’ve compiled a step-by-step easy-to-follow guide to help you learn to crochet with some helpful tips along the way!
What do I need to begin crocheting?
One of the best things about crocheting is that you don’t need a lot to get started – you can get by with just two things:
- Yarn
- Crochet Hook
However, having access to additional tools can make things easier. Let’s get a little more detailed and then you’ll be able to decide what’s right for you.
Choose your yarn
Choosing the right yarn for your project will ensure that your finished product looks and feels the way you want it to. Yarn comes in different weights, colors, and fibers.
You can find more information on the different yarn weights in our yarn weight comparison post coming soon! Beginners may find it easier to start with medium weight yarn in a light color. This will make it easier to see your stitches and correct any mishaps along the way.
Choose your hook
Crochet hooks come in different sizes and materials such as metal, plastic, bamboo, and wood. The size of the hook you choose will depend on the weight of the yarn you’re using and the desired gauge. If you aren’t sure which size you need, it’s usually a good idea to check the yarn label – it should display the recommended size.
Additional tools
These may not be required for every project, but it’s usually a good idea to have these handy to make the job easier:
- Scissors – a pair of sharp scissors will come in handy for cutting yarn and trimming loose ends
- Yarn needles – these are used for weaving in loose ends and sewing pieces together
- Stitch markers – these are helpful for marking specific stitches or sections in your work
- Measuring tape – a flexible measuring tape is useful for checking gauge and measuring your work
- Other accessories – some crafts enjoy using a yarn bowl or bag to keep their yarn organized, and a stitch counter to help keep track of their stitches
Now that you have your materials – let’s crochet! Here you’ll find a handy step by step guide that you can refer back to at any time! Remember – it will take some time to learn. Mistakes are okay – they are a part of the process.
A Step-by-Step Guide to Crochet
How to Hold Your Crochet Hook
When holding a crochet hook, there are 2 widely used methods. You can hold the hook however feels most comfortable to you!
Method 1 – The Pencil Grip
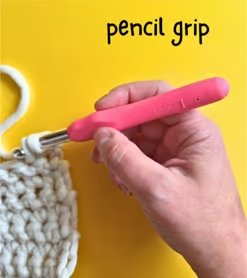
In the pencil method, place your thumb on the flat part of the hook, near the thumb rest or grip area. Rest the hook against the side of your index finger, with the pointed end facing down. Curl your remaining fingers gently around the hook, just like you would when holding a pencil.
Method 2 – The Knife Grip
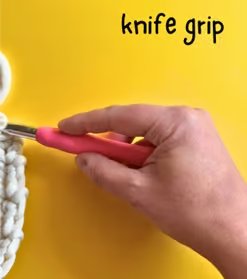
In the knife method, place your right hand over the hook and grasp it between your thumb and index finger to begin. The left hand is used to control the yarn and to hold the stitches as they are created.
Remember to find a grip that feels comfortable for you. Ultimately, the goal is to find a grip that allows you to manipulate the hook smoothly and maintain control while working on your crochet project. Practice and experimentation will help you determine the most comfortable and efficient method for you.
How to Hold Yarn When Crocheting
It’s important to learn how to hold your yarn because of tension. Tension is important in crochet because it affects the overall appearance and size of your project. When you crochet with consistent tension, it ensures that your stitches are uniform in size and appearance. This is especially important when working on projects that require precise measurements.
Hold your non-dominant hand out in front of you, face down. Bring the initial strand of yarn under your pinky, ring finger, or middle finger. Then wrap it over your pointer finger. Control the tension by squeezing your fingers together as you work a stitch and pull more yarn into your project. When you squeeze, you’ll add more tension and your stitches will be smaller. Less squeezing results in a lower tension and more loose stitching.
How to Crochet for Beginners
This is an Instructable to teach a beginner how to crochet. All you need is some fat yarn and a size N crochet hook.
Step 1: Make a Slip Knot.
Begin the slip knot by laying the yarn down and looping it. Making sure your short piece, the tail, is on top of the long yarn. Next, flip the whole thing down, onto the longer yarn. Grab the middle yarn between your thumb and forefinger and pull the middle yarn out gently. Hang on to tail and pull the loop tight.
Step 2: Tighten the Loop
Pick up the loop in your left hand and slide the hook into the loop and tighten the loop around the hook. Not too tight, there should be some give. Note: I started out life left-handed and am now ambidextrous. I prefer to teach the way my nana taught me because it’s how all the books are published.
Step 3: How to Hold the Thread
Turn the long side of the thread around your pinkie and twist it around your index finger. Grab the short side, the tail, with your middle and ring fingers. Hold the hook in your right hand. This way of holding the thread and hook will create enough space to move the hook and it keeps tension on the thread.
There are multiple ways to keep your thread and hook, find out what works the best for you.
Step 4: Begin the Chain
Begin with the starting chain stitch by twisting the thread around the hook and pull it through the loop.
Step 5: Finish the Chain
Don’t make the loop too tight and continue to the second loop by pulling the thread trough the second loop. Keep continuing until you have a chain.
Step 6: Begin the First Row
To start the first row of single crochet insert the hook in the second chain from the hook. You now have two loops around your hook.
Step 7: Crocheting the Chained Row
Catch the yarn in your left hand with the hook and pull it through the first loop. This will leave you again with two loops on your hook. Catch the yarn again with your hook and pull it through both loops. Repeat these steps until you get to the end of the chained row.
To crochet more rows, chain one stitch at the end of each of the end of your row and turn your crocheting over to start the next row.
Step 8: Finish
To finish, cut the long side of the yarn and pull it through the loop. Remember, it doesn’t matter what you’re crocheting, it only matters that you’re doing it!!